Subtitle a Video
Subtitling: Adam Silverstein: Making Ads Great Again
Instructions
Adding captions or translations is a great way to take your favorite WordPress.tv video and share it with an even broader audience! It is easy to help us with this goal by submitting a caption or translation file for your favorite video. Just follow the steps below!
Step-by-step video
Text instructions – Creating and uploading a new caption file
The tools at Amara.org will help you to create your caption or translation file. So before you begin, be sure to sign up for a free account on Amara.org.
In addition to helping you create a caption file, the tools at Amara.org also allow you to stop and start again in the middle of the captioning process. That way if you get interrupted, you can save your subtitles and pick up where you left off.
Once you have created your Amara.org account, you can follow these steps to create and upload your new caption file:
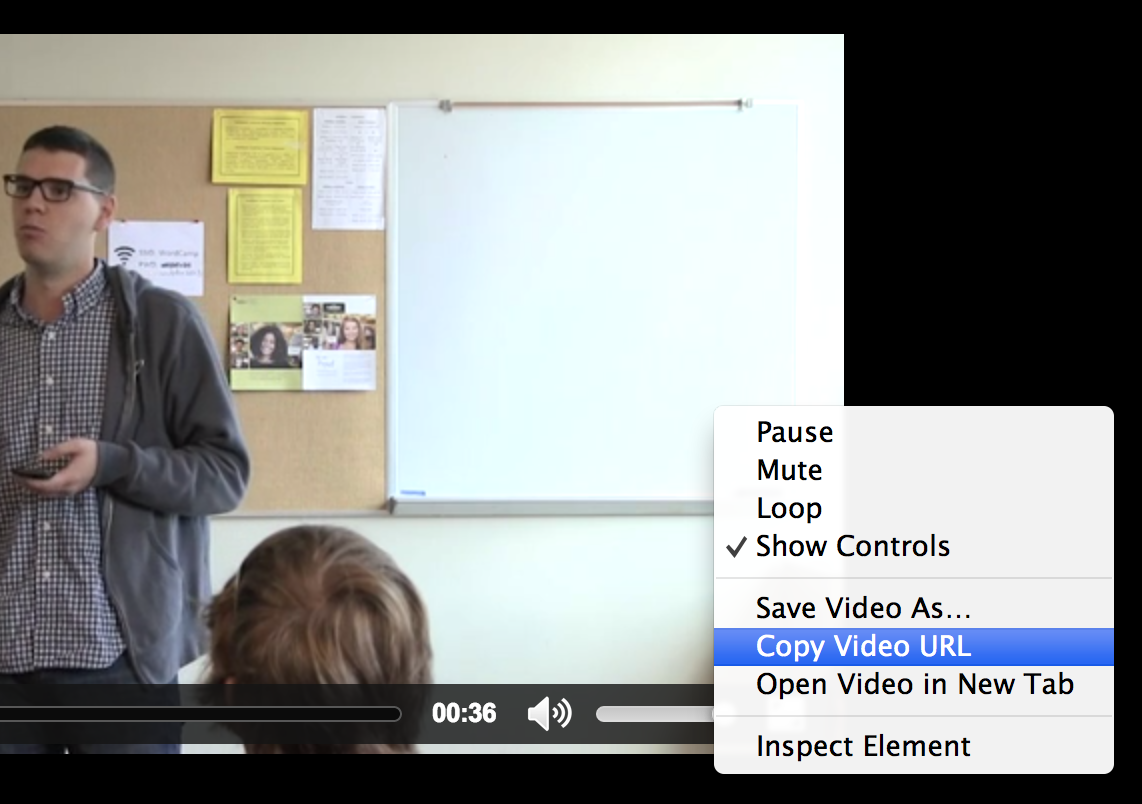
Step 1 – Copy the video URL
Locate the “Med” link in the Download section of the sidebar.

Right-click on that link and select the option that will copy the video URL. Each browser has slightly different terminology for this. Yours may say “Copy Link”, “Copy Link Address”, “Copy Link Location”, or something similar.
Step 2 – launch video in Amara
Go to http://www.amara.org/en/videos/create/ and enter the video URL you copied from WordPress.tv.

Next click “Subtitle Me” and follow the instructions provided by Amara.org

Step 3 – Download the translation file
Once the video is subtitled at Amara.org, click on the link under View Subtitles, to the left of the video display.

Next click on the Download drop-down menu and select DFXP format.

When you have downloaded the caption file to your computer, you should have a file that looks something like this: wordcamp-minneapolis-2014.dfxp In order to have this file work with WordPress.tv (which only accepts .ttml files) just edit the file extension to change it from .dfxp to .ttml, like so: wordcamp-minneapolis-2014.ttml
Step 4 – Upload your caption file
Return to the WordPress.tv video page, and click on the “Subtitle this video” button at the bottom of the sidebar.

On the next page, choose your file for upload, select your language from the drop-down selector, and then click Submit button. 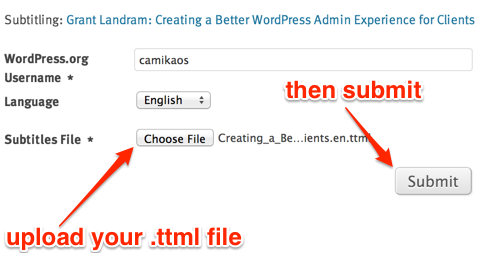
Success! Your subtitles will go through a short moderation process, and then you can enjoy your newly captioned video in all its text-enriched glory. Thank you for helping out! 🙂
Translating an existing caption file
In cases where there is already a caption file uploaded to a video, you do not need to use Amara at all, as it is usually much easier to translate the existing file instead.
Step 1 – Locate the existing .ttml file
Load the page for the video you would like to add a translation for. You can find the TTML link under the Subtitles section of the video information sidebar.

Step 2 – Download and open the .ttml file
Download the existing caption file and then open it in a simple text-editor like Notepad or TextEdit. Avoid using applications like Word or Dreamweaver, because they will distort the TTML markup.
Step 3 – Translate subtitle text
Inside the downloaded file, you’ll see the speaker’s words surrounded by <p> and </p> tags. Translate all of the speaker’s words into your language, but be careful not to change the surrounding <p> tags at all.

Step 4 – Change the language abbreviation
Locate xml:lang=”en” near the top of the TTML document, and change the two letter language abbreviation to the language you are translating the file into.
For example, if you are translating the file into German, you would change this to xml:lang=”de” instead. If you are not sure what abbreviation to use, here is a list of common two letter country codes
Step 5 – Save and upload your translated caption file
When you’re finished, save the file—being sure to use the original TTML file extension—and return to the WordPress.tv video page, then click on the “Subtitle this video” button at the bottom of the sidebar.
On the next page, choose your file for upload, select your language from the drop-down selector, and then click Submit button.
Success! Your subtitles will go through a short moderation process, and then you can enjoy your newly captioned video in all its text-enriched glory. Thank you for helping out! 🙂
An ![]() Production
Production
